How to Install the Maxxair Maxxfan Deluxe
Installing the Maxxair Maxxfan Deluxe
Nothing is worse than stepping into your van on a hot summer day and feeling like you are in an oven. Bad airflow can make even the best camper feel like a sauna, so good ventilation is a must. That is where the Maxxair Maxxfan Deluxe comes in. It is one of the best ways to keep air fresh in your van or caravan. It helps stop moisture buildup, controls temperature and makes your van more comfortable when cooking, sleeping, or relaxing after a long day. But let’s be honest—cutting a hole in your roof sounds a bit scary.
If you’ve been putting off installing a Maxxfan because you’re not sure where to start, don’t stress—we’ve got you covered. This step-by-step guide will walk you through everything from the fan’s features to how it compares to other models and what makes it a great choice for van travellers. From picking the perfect spot to wiring it up and sealing it properly so there’s no chance of leaks. We will also cover installation tips and buying advice to help you get the best setup for your needs. With the right tools, patience, and our foolproof method, you’ll have your Maxxfan up and running in no time. So, grab a cold one (or a cuppa), roll up your sleeves, and let’s make your van cooler, fresher, and road trip-ready!
What is the Maxxair Maxxfan Deluxe and why is it perfect for van life?
The Maxxair Maxxfan Deluxe is a great modern ventilation solution for travelling van enthusiasts. It is a powerful roof-mounted ventilation system that keeps fresh air moving. It helps prevent heat buildup and stops condensation from things like cooking fumes or shower humidity. The fan comes in various models, including the popular 7500K, which is perfect for Sprinter and Transit vans. Many van lifers comment on how this fan has made a huge difference in their comfort levels.
Where traditional exhaust fans only push air out, the Maxxfan Deluxe offers more features. It pulls fresh air in and pushes stale air out. It is easy to use and does not use much power. This fan also has adjustable speeds, and a rain cover to work in all weather and keep you comfortable. It is super quiet, has a fine mesh screen to keep bugs out, and provides an unblocked view when closed. If you don't know much about van ventilation, this fan is an excellent choice to provide a comfortable living space in your little home on wheels.
Key Features - Why Choose the Maxxfan Deluxe Over Other Models?
- 10-Speed Motor – Control airflow from a light breeze to strong ventilation.
- Reversible Airflow – Choose between pulling in fresh air or pushing out stale air.
- Built-in Rain Cover – Keeps the inside dry while allowing airflow, even in the rain.
- Ceiling Fan Mode – Circulates air inside, even when the vent is closed, to help control temperature.
- Remote Control (Electric Model Only) – Change fan settings without getting up.
- Rain Sensor – Closes the vent on its own when it starts raining.
- Dual Lifting Arms – Adds stability and prevents the lid from rattling in strong winds.
These features keep your van cool, dry, and fresh with no extra effort.
| Feature | Maxxair 4500 (with rain) | Maxxair Deluxe (Manual) |
|---|---|---|
| Operation Type | Electric (remote-controlled) | Manual |
| Rain Sensor | ✅ Closes automatically | ❌ No automatic closing |
| Use While Closed | ❌ No airflow when closed | ✅ Can still ventilate |
| Fan Speeds | 10-speed motor | 10-speed motor |
| Ideal For | Hands-free operation, remote convenience | All-weather use, better ventilation in rain |
Which Maxxair Fan Should You Buy?
- Get the Maxxair 4500 if: You want automatic closing and a remote-controlled fan.
- Get the Maxxair Deluxe if: You need ventilation in all weather conditions and prefer manual control.
- Check Your Roof Thickness Before Buying:
- Deluxe needs a 25mm minimum thickness.
- 4500 model needs a 50mm minimum thickness.
Where to Buy Your Maxxair Fan
Outback Equipment has everything you need.
What tools and materials do I need for a DIY Maxxfan Deluxe installation?
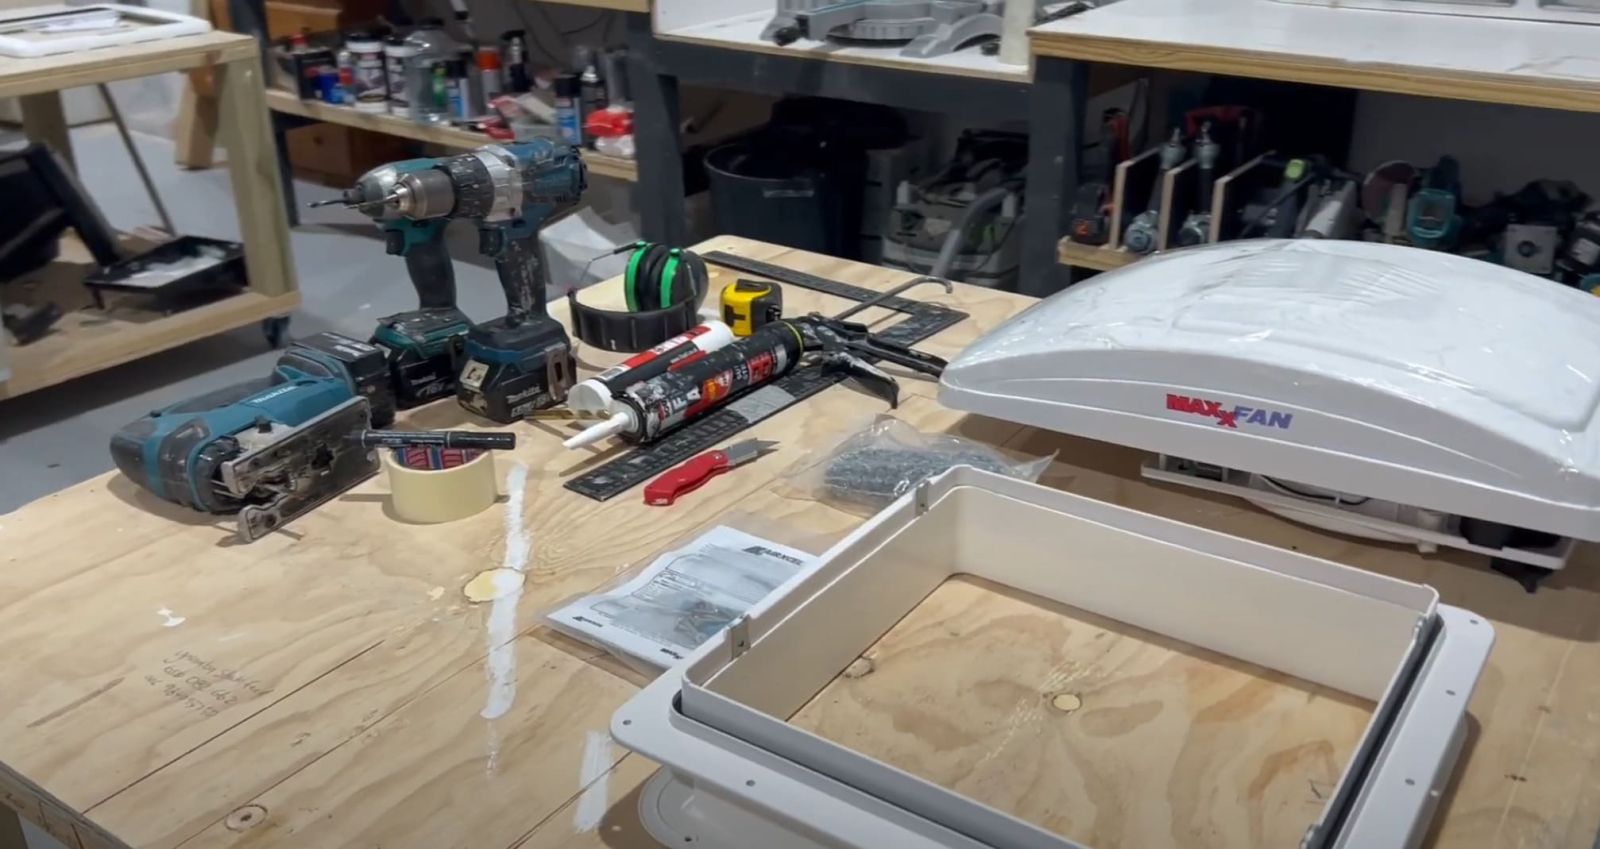
Before installing your Maxxair Maxxfan Deluxe, gather all the tools and materials to make the job easier and avoid delays. An installation kit with all the essentials can help. Check product details online to ensure you have the right model.
You'll need:
- A jigsaw for cutting the roof opening smoothly and accurately.
- A drill for pre-drilling holes to secure the fan properly.
- Silicone sealant for sealing gaps to prevent leaks.
- Rust-proofing paint for protecting metal edges from rust.
- A measuring tape and marker for accurate measurements before cutting.
- A screwdriver and screws for fastening the fan and mounting the flange securely.
A clean and dry work area is just as important. Make sure your roof is free of dirt, dust, and metal shavings before applying sealant or installing the fan.
Preparation and Step-by-Step Installation Process
1. Measure and Mark the Installation Spot
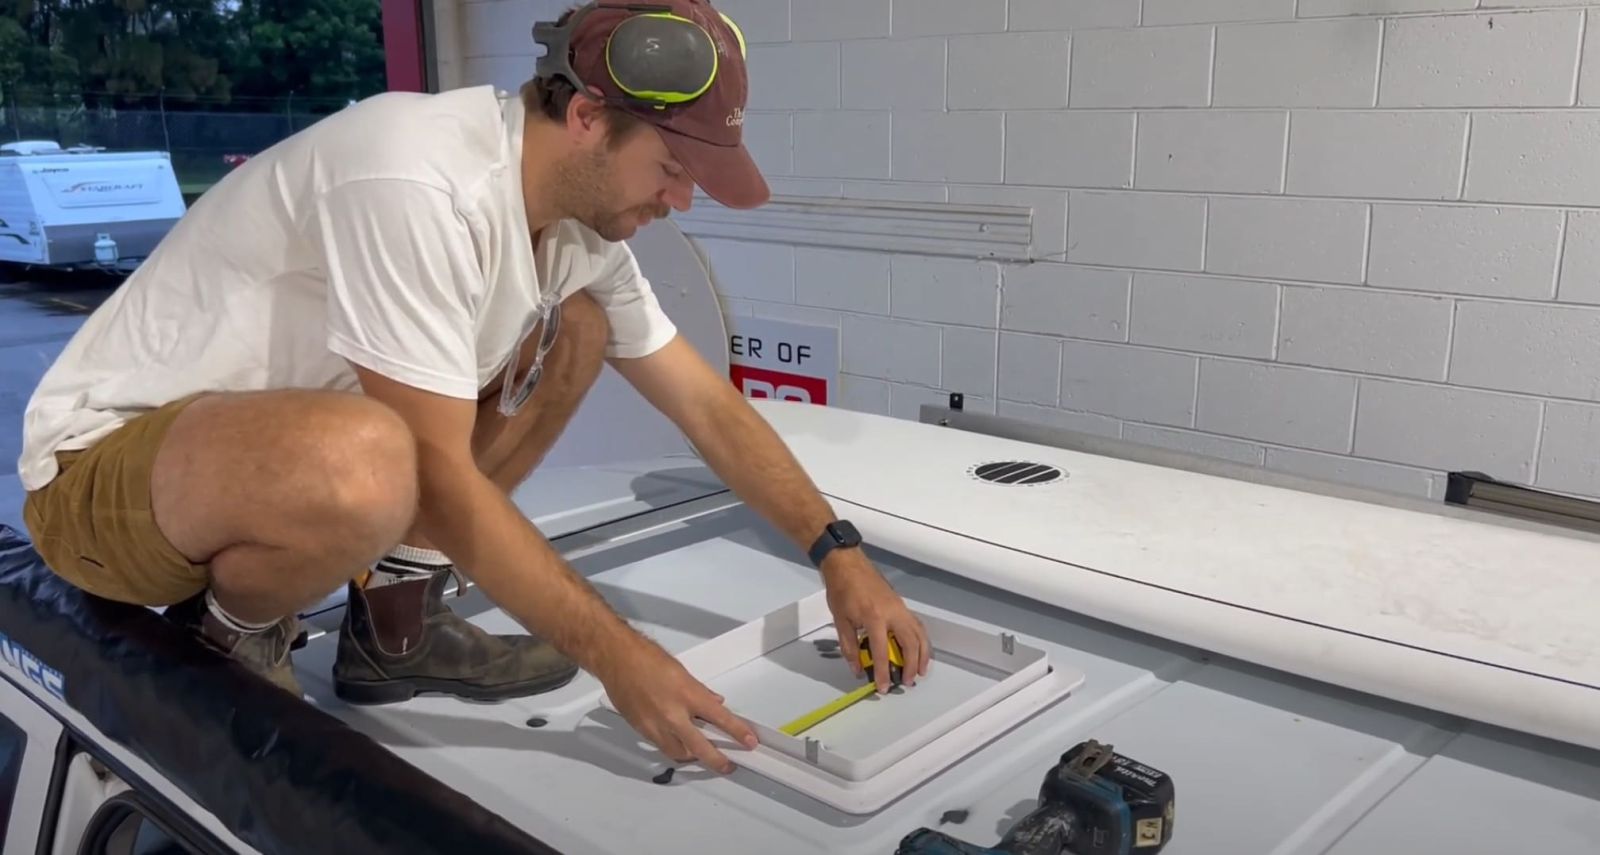
- Find a rib-free section on your van’s roof for the installation.
- Ensure it will not interfere with solar panels, roof racks, or antennas.
- Use a measuring tape and marker to outline the exact cut location.
- Double-check the measurements—cutting in the wrong spot is not an easy fix!
2. Cut the Roof Opening
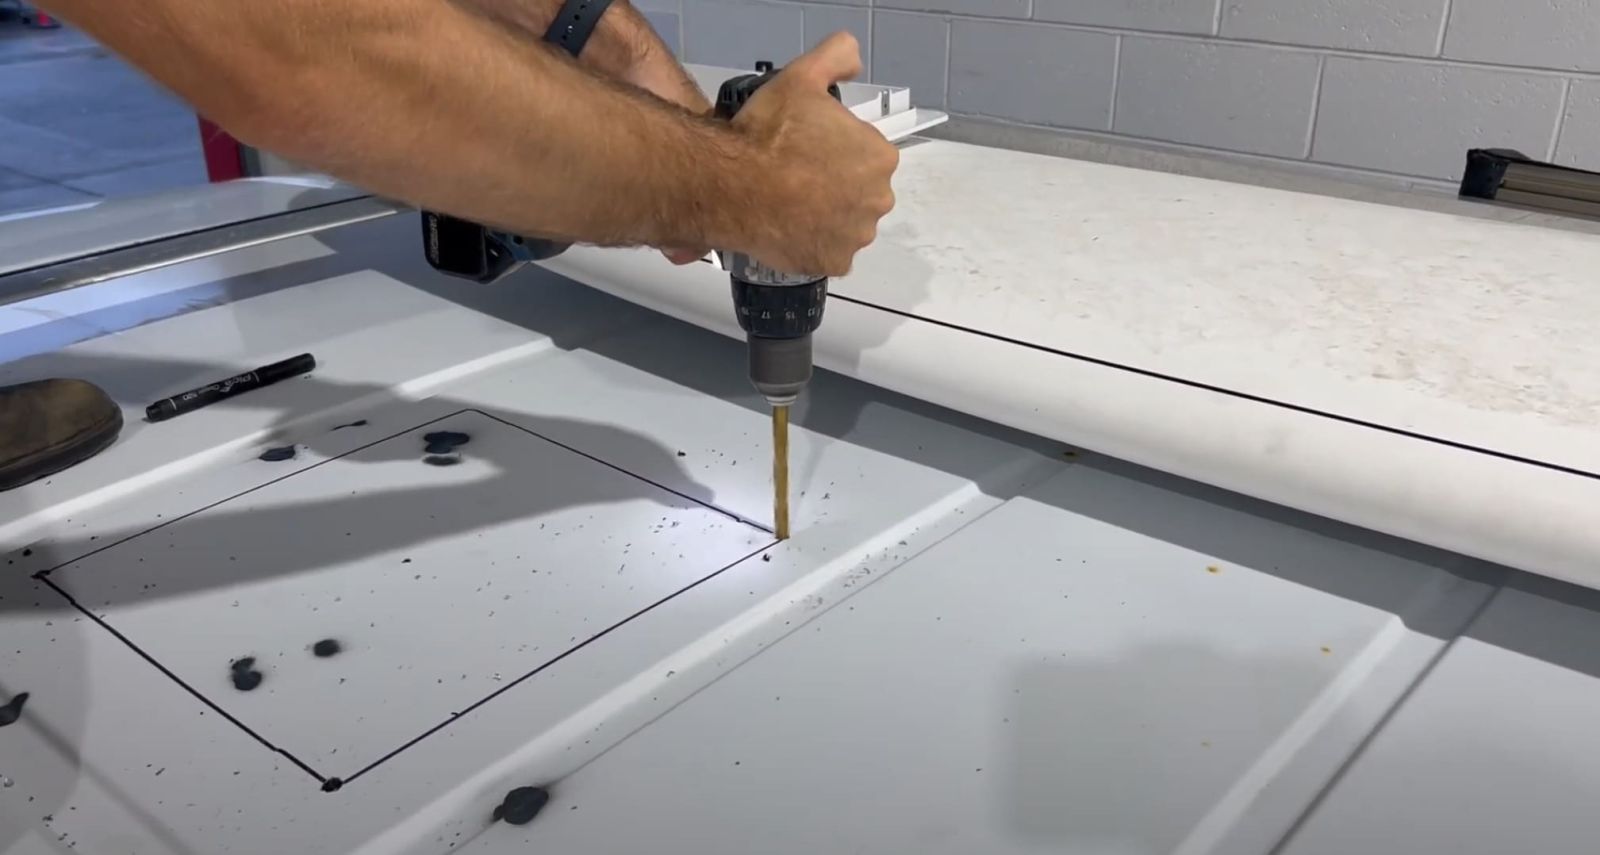
- Drill a pilot hole in each corner of the marked area.
- Use a jigsaw to cut along the lines, creating the fan opening.
- Work slowly and follow the outline to avoid cutting too large of a hole.
3. Prep and Seal the Edges
- Use a file to smooth out rough edges from the cut.
- Apply rust-proofing paint to the exposed metal.
- Let it dry completely before moving on to the next step.
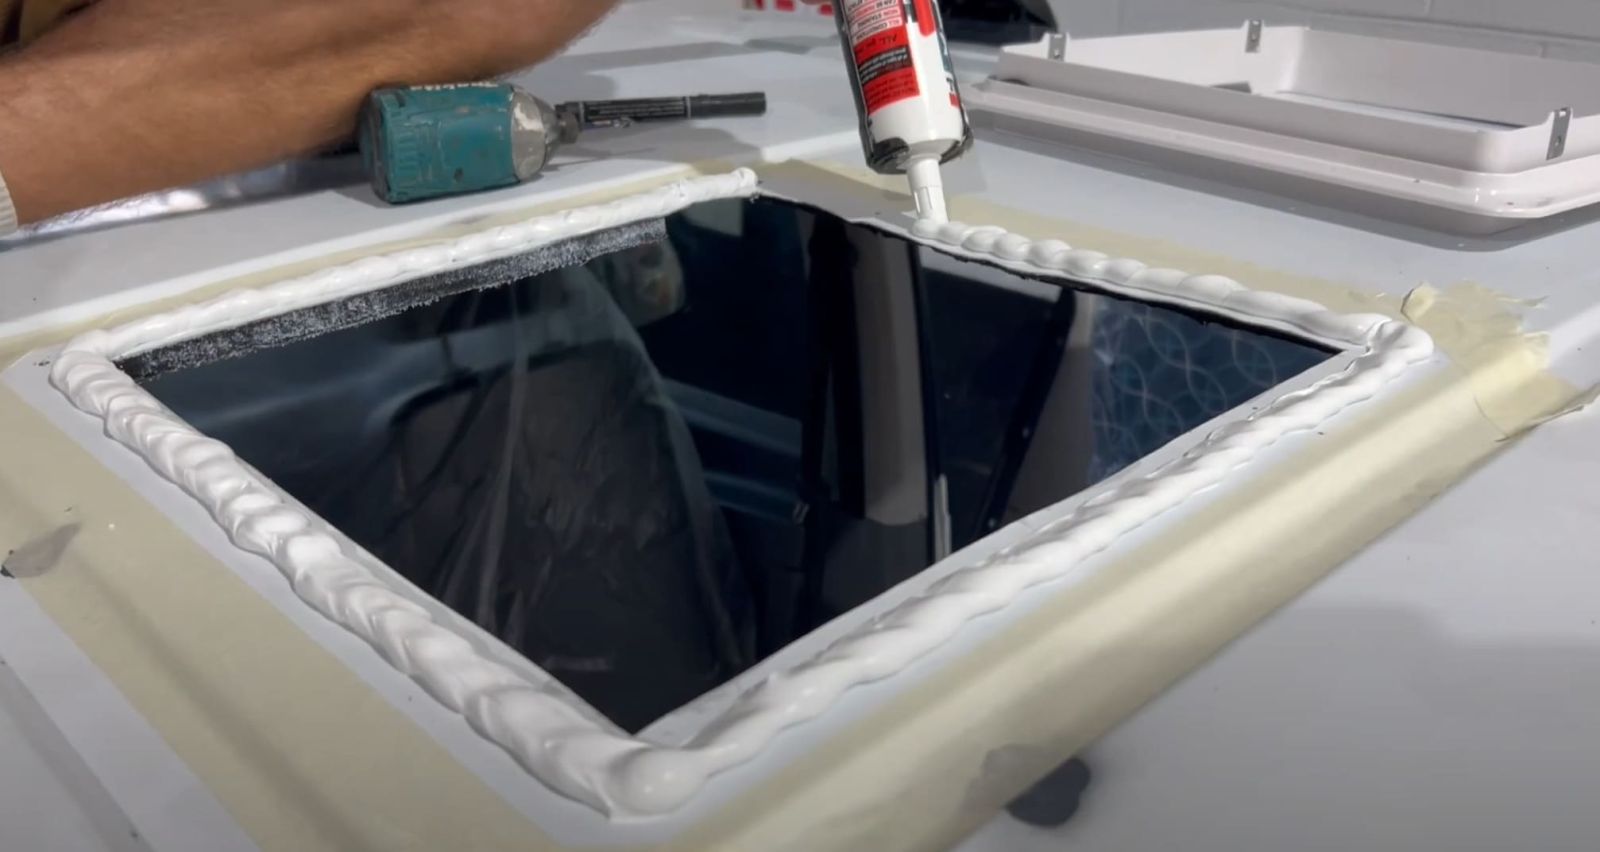
4. Secure the Flange and Apply Sealant
- Place the mounting flange over the opening and check for fit.
- Pre-drill holes through the screw points on the flange.
- Apply a generous bead of silicone sealant around the edges.
- Secure the flange with screws, ensuring it is tightly sealed.
5. Attach and Wire the Fan
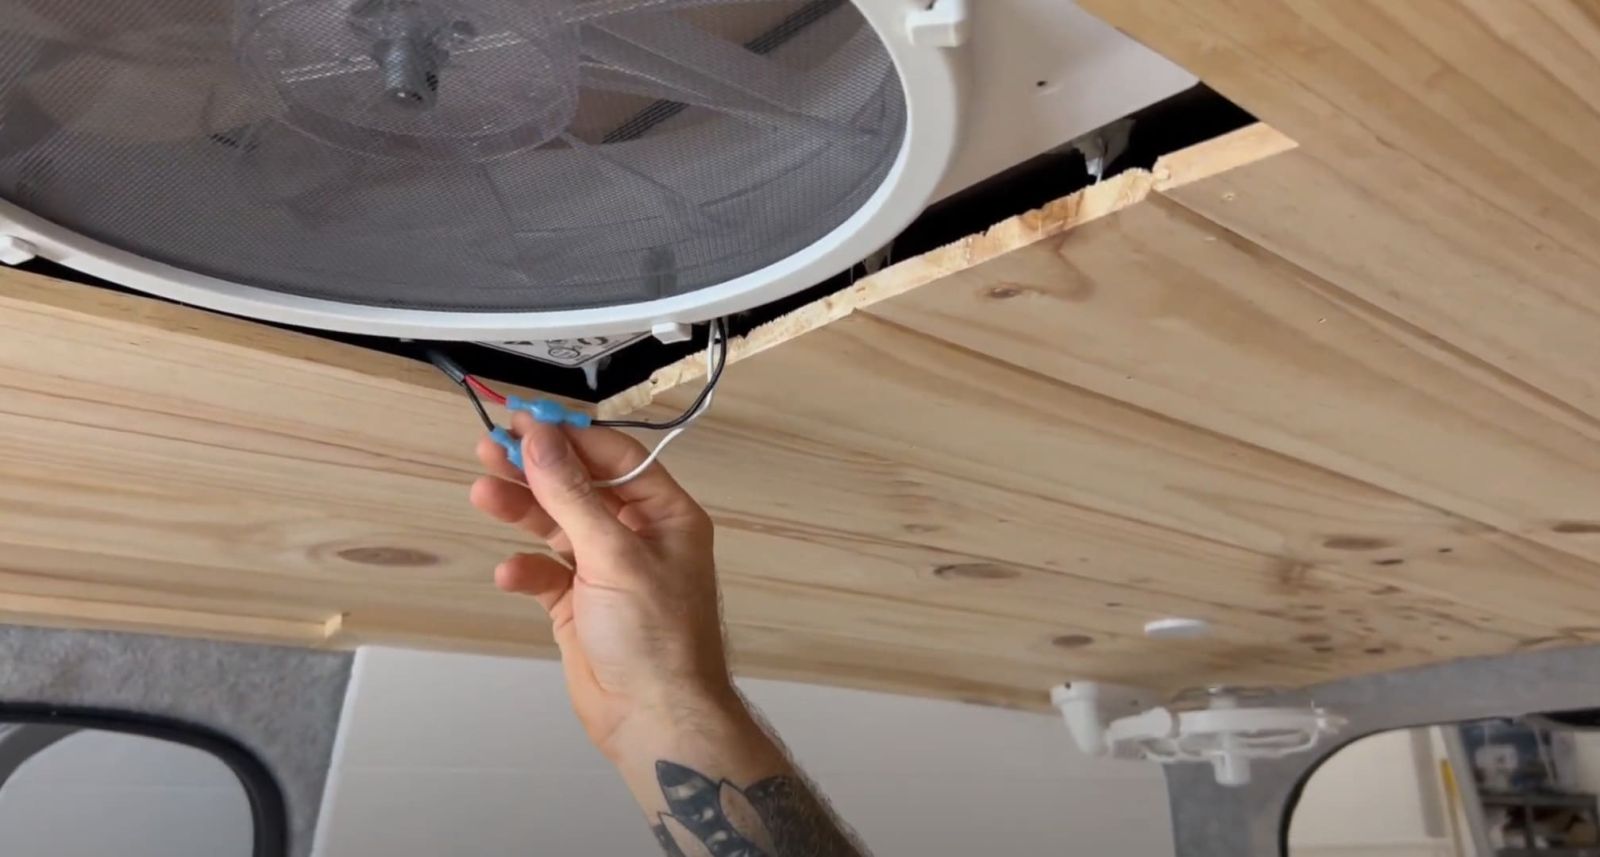
- Position the Maxxfan Deluxe onto the flange.
- Ensure it sits evenly, with no obstructions.
- Connect the wiring:
- Black wire = Negative (-)
- Red wire = Positive (+)
- Test the power connection to make sure the fan turns on.
6. Final Touches and Testing
- Check for air leaks around the seal.
- Ensure the lid opens and closes smoothly.
- If using sealant around screws, smooth it out for a clean finish.
- Wipe away excess sealant and let everything dry before use.
Once installed, your van will have better airflow, cooler temperatures, and improved ventilation.
Troubleshooting and Common Installation Mistakes
- Leaking around the seal? Apply more sealant around the edges to prevent leaks.
- Fan not turning on? Check the wiring connections and power supply.
- Vibration noise during use? Tighten the screws and ensure the fan is securely mounted.
How Do I Ensure a Proper Fit and Seal for My Maxxfan Deluxe?
Getting a perfect fit and a watertight seal is one of the most important parts of installing your Maxxfan Deluxe. A bad seal can lead to leaks, rust, and long-term damage to your van. To avoid any issues, follow these key steps.
- Double-Check Your Measurements. Before cutting, make sure the fan fits within a rib-free section of your roof. Measure twice and mark the cutout with a marker for accuracy.
- File and Prime the Cut Edges. After cutting the hole, use a file to smooth out any rough metal edges. Apply rust-proofing paint to prevent corrosion.
- Use Plenty of Silicone Sealant. When securing the mounting flange, apply a thick and even bead of silicone around the edges. This ensures a strong waterproof seal.
- Tighten the screws evenly to secure the flange. Use a criss-cross pattern to spread the pressure and prevent warping or gaps.
- Check for Gaps. Once the flange is secured, check that it sits flush against the roof with no visible gaps. If needed, apply more sealant to fill any spaces.
Testing for Leaks and Addressing Potential Issues
After installation, it’s important to test for leaks before hitting the road. Here’s how to do it properly:
- Simulate Rainfall. Use a hose or bucket of water to pour over the sealed edges of the fan. Make sure water runs over the sealant and screw points.
- Inspect from the Inside. Check around the flange and fan housing for any signs of water seeping through.
- Seal any leaks by drying the area completely and applying another layer of silicone sealant
- Let the Sealant Cure. Silicone takes time to fully cure, so avoid driving in heavy rain until it has dried completely.
A proper seal is the key to long-term durability. Spending extra time on this step will prevent water damage and future headaches.
Installing the Interior Trim and Rain Shield
Once the fan is secured and waterproofed, it’s time to finish the interior setup.
Fitting the Interior Trim
- The trim piece (or garnish) gives the Maxxfan a clean, finished look inside your van.
- Slide it into place and check for a snug fit against the ceiling.
- If needed, trim the garnish using a jigsaw or hand saw to match your roof’s thickness.
- Secure it using the provided white-tip screws, making sure it sits flush.
Adding a Rain Shield as an Optional Upgrade
- The Maxxfan Deluxe already comes with a built-in rain cover. If you want extra protection, this is a good choice.
- A Maxxair Fanmate Vent Cover can be installed over the fan for more weather resistance.
- These covers clip on easily and help block heavy rain from many angles while still allowing airflow.
With the trim and shield installed, your van has a secure and weatherproof ventilation system.
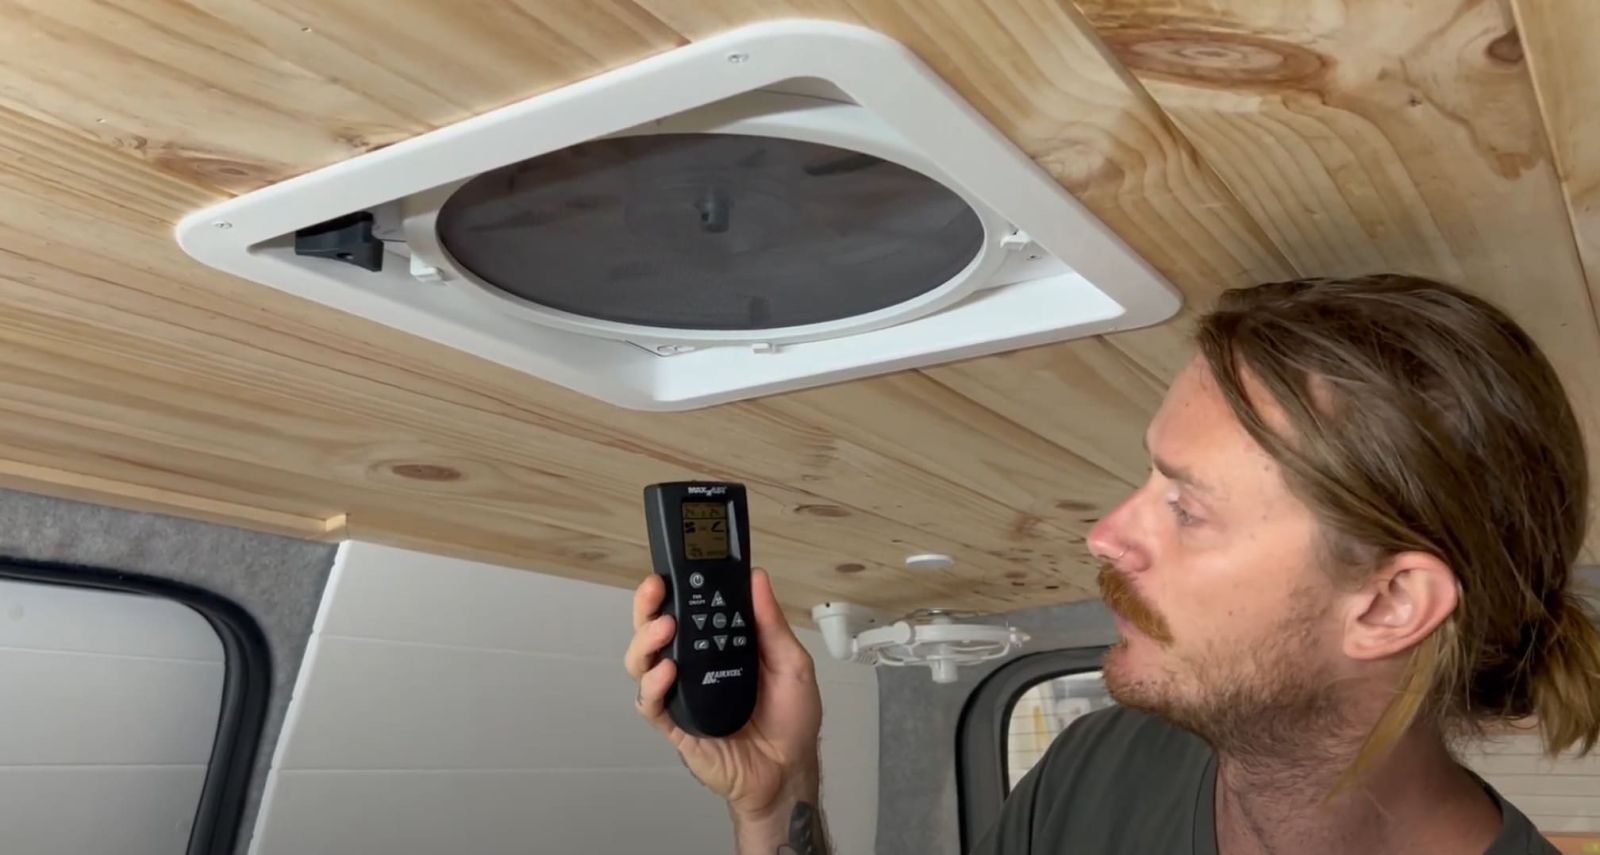
Fine-Tuning the Fan’s Operation and Settings
Now that your Maxxfan Deluxe is installed, it’s time to get familiar with its controls and settings to make the most of it.
- Adjusting Fan Speed. The fan has 10 speed settings, from a gentle breeze to full-power ventilation. Start on a lower setting and adjust based on airflow needs.
- Using the Reversible Airflow Feature. The fan can either pull fresh air in or push stale air out. If your van feels humid, set it to exhaust mode. If you need fresh air inside, switch to intake mode.
- Using the Remote Control (Electric Model Only). If you have the electric version, use the remote to change fan speeds, adjust the vent lid, and switch modes without getting up.
- Testing the Rain Sensor (4500 Model Only). The rain sensor automatically closes the fan lid when it detects rain. Pour some water over the sensor to ensure it’s working properly.
Optional Accessories to Enhance Your Maxxfan Deluxe
1. Maxxair Fanmate Vent Cover
To keep your fan running in any weather, the Maxxair Fanmate Vent Cover is a great add-on. The Maxxfan Deluxe has a built-in rain cover, but this extra layer protects against heavy rain and strong winds. It keeps airflow strong while preventing water from getting in, making it ideal for stormy or wet conditions.
2. Maxxair Remote Control
The electric Maxxfan Deluxe comes with a remote, but you can upgrade the manual version to one. This allows you to adjust the fan speed and settings from your bed or seat. No need to reach up—just press a button and relax.
3. Insulated Vent Cover
For those who travel in colder climates, an insulated vent cover is a must. It helps to block drafts and keep warmth inside your van when the fan is not in use. These covers attach easily and can make a big difference in maintaining a comfortable temperature in winter.
4. Roof Vent Locking Kit
If security is a concern, a roof vent locking kit adds an extra layer of protection. This helps secure the fan lid, making it harder for someone to tamper with it while you are away from your van.
5. Solar-Powered Ventilation Booster
A solar-powered fan keeps air moving without using your van’s battery. It works with the Maxxfan to maintain airflow and keep your van cool.
6. Extra Sealant and Gasket Kit
For better leak protection, a gasket and sealant kit help to keep water out. It’s useful in heavy rain or bad weather.
Where Can I Find Additional Resources and Support for My Maxxfan Deluxe Installation?
Sometimes seeing someone else do it first makes all the difference. There are great YouTube tutorials from van builders and installers that can walk you through the whole process.
- South Coast Van Fitouts with Outback Equipment guide you through the entire Maxxfan Deluxe setup, from unpacking to sealing and final checks.
- DIY Van Build Channels. Search for "Maxxfan Deluxe Installation" on YouTube to find video of the fan installed in different van setups
These videos show common mistakes and fixes, helping you save time and avoid leaks.
Online Communities and Forums for Van Conversion Enthusiasts
If you have problems or want tips, online groups are great for asking questions and getting advice from others.
Top Van Life & DIY Build Communities:
- Facebook Groups
- Vanlife Australia – Connect with locals who have installed the Maxxfan in their rigs.
- DIY Campervan Conversions – A great resource for troubleshooting installation problems.
- Reddit
- r/vandwellers – Read installation tips and get advice.
- r/Caravanning – Talk to caravan owners who have used the Maxxfan.
- Van Build Forums
- VanLifeForum.com – A place to ask questions, share builds, and get technical help.
- DIYCamperVan.com – Contains guides and real experiences on ventilation setups.
These communities are full of great advice, and chances are, someone has already asked the same question you have.
Manufacturer Support and Warranty Information
For problems, missing parts, or warranty claims, contact Maxxair support. They provide manuals, help guides, and customer service for setup or use.
How to Get Help from Maxxair:
- Website. Go to www.airxcel.com/maxxair for manuals, FAQs, and warranty info.
- Customer Support. Contact their team for help with defects or issues.
- Warranty. The Maxxfan Deluxe has a limited warranty. Check the terms to see what is covered.
If you bought your fan from Outback Equipment or another store, they may help with installation and support.
Get Your Maxxfan Deluxe from Outback Equipment
Want to improve airflow in your van? Outback Equipment has what you need. Find Maxxfan Deluxe fans, install kits, and extras for your van setup.
Check out Outback Equipment’s range of Maxxfan Deluxe fans and accessories today! Click here to browse and get the best deals!
