Installing a Watersnake Electric Motor Bow Mounting
What Is a Watersnake Electric Motor?
A Watersnake electric motor is a trolling motor that sits at the front (Bow) of your boat. It's designed for quiet, smooth movement through the water. Unlike a petrol motor, trolling motors run on battery power and give you more control while fishing or cruising slowly along the shore.
These motors are easy to operate with a hand remote or foot control. You can adjust your speed, turn left or right, and stop or start without needing to touch your main outboard. That’s why they’re popular with anglers and small boat owners across Australia.
Watersnake motors support a range of setups. Bow mounting gives you better tracking and steering. It also makes it easier to hold your position in wind or current. With the right battery and wiring, they’re ideal for tinny builds, kayaks, and even small offshore boats.
What You’ll Need for the Installation
To set up a bow mount Watersnake electric motor, you’ll want everything prepped before you begin. This install is DIY-friendly, but having the right gear on hand will save time.
- Watersnake electric trolling motor
The featured model, Watersnake Stealth, includes a hand remote, foot control wiring, and Anderson plug pre-installed. - Quick-release bracket
Allows fast removal of the motor. This install used one with six bolts and Phillips head screws. - Custom or welded mounting plate
A flat surface at the bow makes installation easier. Curved bows may need a welded bracket for support. - Lithium deep-cycle battery
A 125Ah Enerdrive lithium battery was used in the video. Lightweight and long-lasting for remote use. - 50 amp circuit breaker
Added between the motor and battery for safe operation and protection from overload. - Basic tools
You’ll need a drill, Phillips screwdriver, spanners, wiring cutters, and conduit for clean cable routing.
Step-by-Step Watersnake Installation
1. Prepping the Bow for Mounting
The motor needs a flat surface to sit properly. A welded plate gives the best result, but any solid, level area will work.
- Weld or bolt a flat plate onto the bow to support the motor.
- Check that the surface is level and strong enough for the bracket.
- Avoid mounting directly onto a curved bow unless it's reinforced or modified.
2. Installing the Quick-Release Bracket
The bracket lets you remove the motor quickly when not in use. It comes with all the bolts and hardware needed.
- Remove the two side covers on the motor using a Phillips head screwdriver.
- Line up the quick-release base plate on the bow plate.
- Mark the hole positions.
- Drill holes using a suitable bit.
- Bolt the bracket down firmly with the supplied hardware.
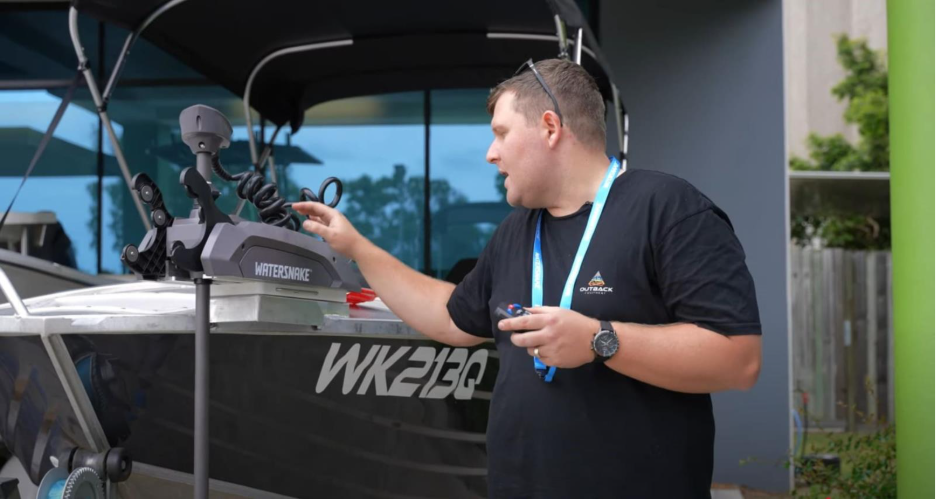
3. Mounting the Watersnake Motor
Once the bracket is installed, fitting the motor is quick. You’ll also install the propeller at this stage.
- Drop the motor into the bracket.
- Insert the drive pin to secure it.
- Fit the propeller while the motor is out of the water.
- Double-check that everything is seated and locked in place.
Wiring the Watersnake Motor
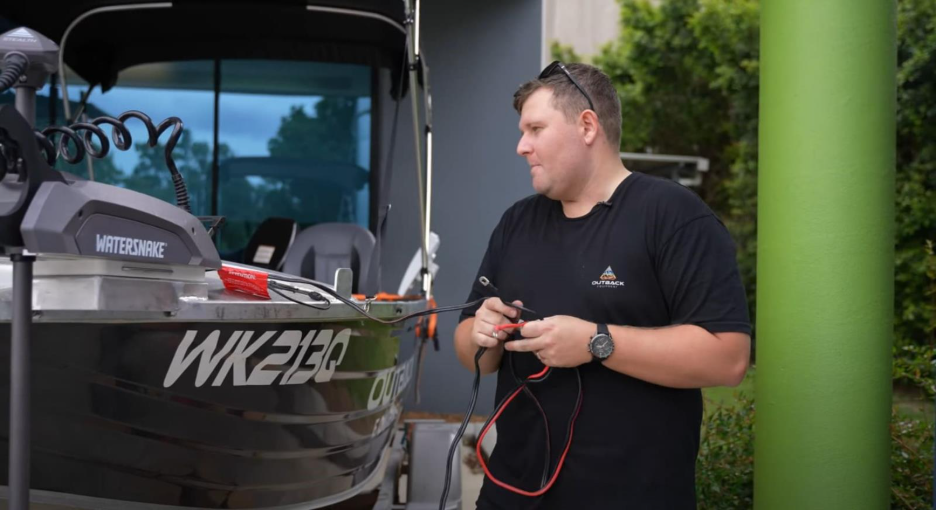
The Watersnake motor comes with a wiring harness already connected. It includes an Anderson plug and ring terminals, ready to run straight to a battery if it's mounted close to the bow.
If the battery is placed at the back of the boat, you'll need to cut the cable near the ring terminals. From there, extend the leads to reach the battery. The wires should be run through flexible conduit to keep the setup neat and protected.
To wire it:
- Cut the cables near the ring terminals on the Watersnake wiring harness.
- Attach new lengths of wire to extend the run from the bow to the battery location.
- Feed the wires through conduit along the internal edge of the hull or under the gunwale.
- Leave enough slack at both ends to make clean connections without tension.
- Prepare the wiring to connect to the circuit breaker and battery (covered in the next step).
The motor also includes wiring for a foot control. If you're using the handheld remote instead, you'll still have access to steering, throttle control, and basic on-off functions.
Keeping the battery close to the motor helps reduce voltage drop. But if that’s not possible, careful routing and solid joins will help maintain consistent power.
Installing the Lithium Battery and Circuit Breaker
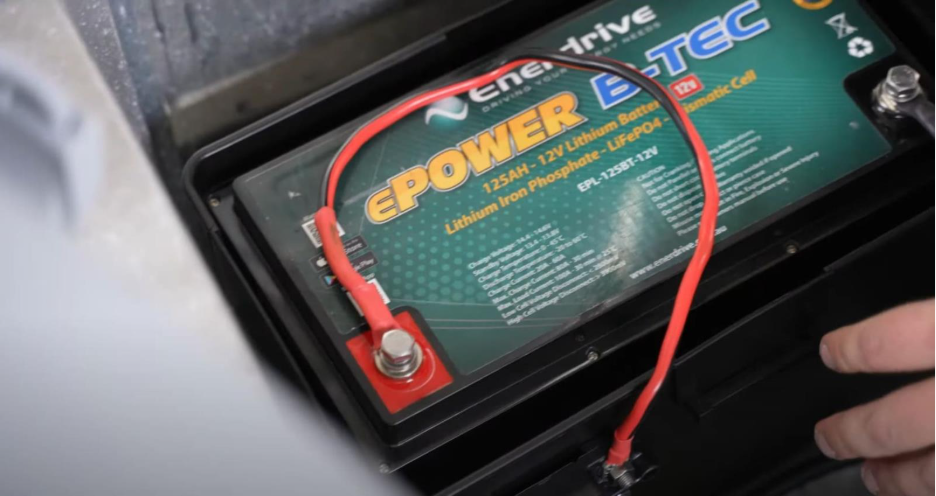
A 125Ah lithium battery was used for this setup. Lithium was chosen because it's lightweight and holds enough charge to run the electric motor for a few days. The installer used an Enerdrive model, but any suitable 12V deep-cycle lithium battery can be used.
Since the battery was mounted at the back of the boat, a 50 amp circuit breaker was added between the positive wire and the battery terminal. This helps protect the system from overload or faults.
To install the battery and circuit breaker:
- Mount the circuit breaker directly to the battery box using two small bolts.
- Connect the extended positive wire from the motor to one side of the circuit breaker.
- Run a short wire from the other side of the breaker to the positive terminal on the battery.
- Connect the negative wire from the motor straight to the negative terminal on the battery.
- Tighten all terminals securely.
This setup keeps the system portable. The circuit breaker stays attached to the battery box, so the whole unit can be removed if needed. No wiring was fixed to the hull.
Testing and Final Setup Tips
Once the wiring is complete and the motor is mounted, it’s time to check that everything works. This step makes sure your Watersnake motor is ready for the water.
- Turn on the lithium battery using the switch or circuit breaker.
- Pair the handheld remote to the motor if it hasn’t connected automatically.
- Press the power button and check that the motor turns on.
- Test steering left and right, and throttle up and down.
- Run the propeller at low speed to confirm it spins freely.
- Check for any loose connections or unresponsive buttons.
Make sure the quick-release bracket is holding the motor firmly and that all bolts are tight. Once confirmed, your Watersnake bow mount setup is good to go.
